Operation Broken Mirror is Act 2 of BO7 Endgame, released on April 30, 2026 with the Season 3 Reloaded update. It picks up right after Operation Poison Pill and ends with a brand new Glitch Fracture boss fight. If you are grinding Endgame for camos, blueprints, and operator skins, this is where the good stuff is.
Fair warning: this operation is significantly harder than Poison Pill. The very first step requires Zone 3, and the final four steps are all Nightmare Zone. You need a well-built operator before you even start. Our team’s first impression? The rewards are solid, with 3 new Dark Ops challenges tied to it, a new animated camo, and plenty of reasons to keep grinding. Treyarch clearly designed this to last, not something you blow through in one sitting.
- 10 linear steps, from Zone 3 all the way to Nightmare Zone
- Final boss: Virus Injection Glitch at Nightmare difficulty
- Beat the boss with all 3 operators for the Neon Gallows animated camo
- New abilities: Thermal Spike, Conductive Shot, Wingman Unit
- New exotics: Pulsebreach (marksman rifle) and Reboot (pistol)
- Endgame is free to play for a limited time
What is Operation Broken Mirror?
Story-wise, Operation Broken Mirror picks up after Cole “Javelin” Donovan infiltrated Guild systems in Poison Pill. Your squad gathers Diagnostic Data to develop Karma’s virus and collapse the Guild’s mirror network from the inside. If you skip the cutscenes, all you need to know is: hack stuff, kill bosses, deliver the virus.
Gameplay-wise, it is 10 steps with objectives ranging from dog escorts and evidence collection to hunting Nightmare Zone bosses and defeating the Virus Injection Glitch Boss. Every step rewards you with XP, consumables, or cosmetics. The difficulty ramps up fast, and the jump from Zone 3 to Nightmare Zone is no joke.
Unlike Poison Pill, Broken Mirror does not ease you in. If your operator cannot survive Zone 3 comfortably, level up first. You should be around Combat Rating 30-40 minimum before starting.
All 10 Steps and Rewards
Operation Broken Mirror has 10 steps that must be completed in order. Here is every objective and reward, organized by the zone requirement. Data sourced from the official Call of Duty blog and verified against our in-game screenshots. JC Amaterasu’s rewards breakdown also covers how each reward looks in-game.
Steps 1-4: Zone 3+
| Step | Name | Objectives | Rewards |
|---|---|---|---|
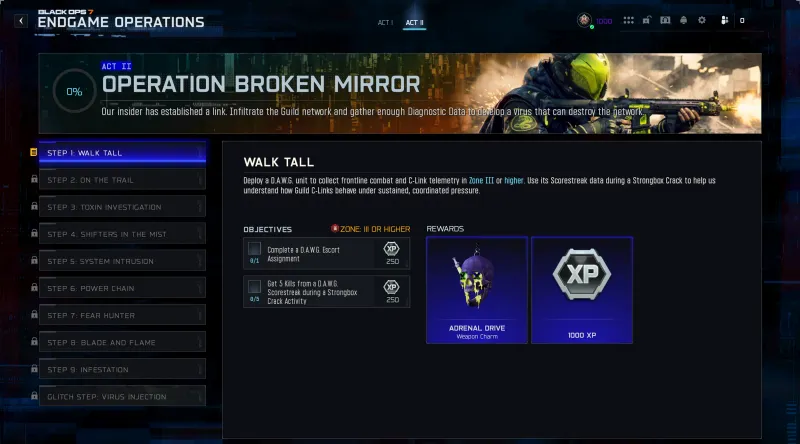
| 1 | Walk Tall | Complete a D.A.W.G. Escort Assignment. Get 5 kills from D.A.W.G. Scorestreak during Strongbox Crack Activity. | ”Adrenal Drive” Weapon Charm, 1,000 XP |
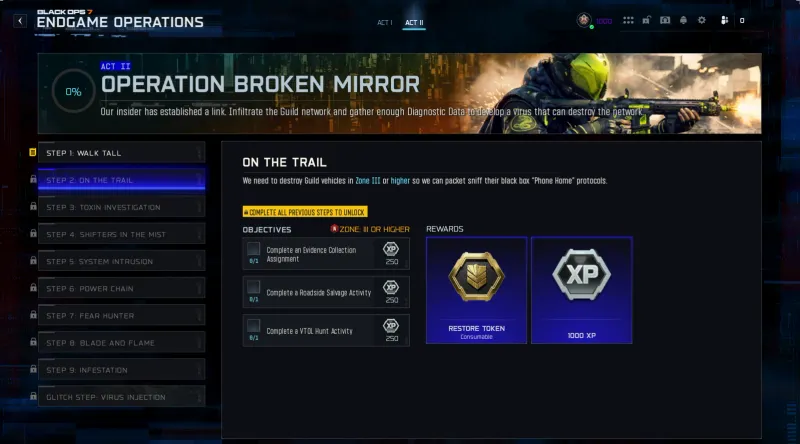
| 2 | On The Trail | Complete Evidence Collection Assignment. Complete Roadside Salvage Activity. Complete VTOL Hunt Activity. | Restore Token, 1,000 XP |
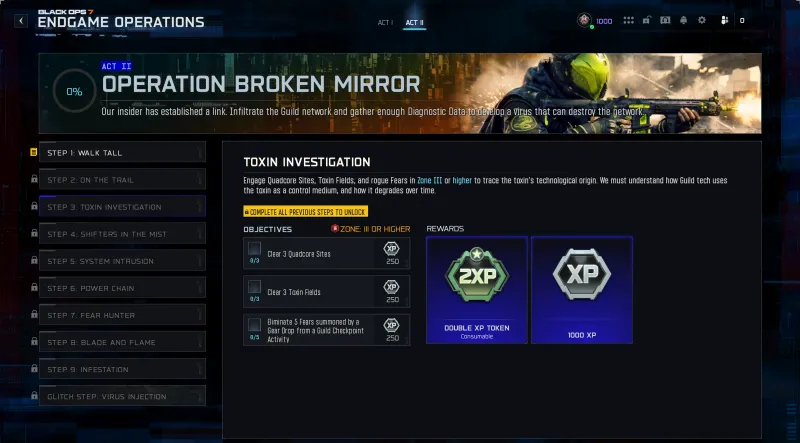
| 3 | Toxin Investigation | Clear 3 Quadcore Sites. Clear 3 Toxin Fields. Eliminate 5 Fears from Gear Drop at Guild Checkpoint. | 1-hour Double XP Token, 1,000 XP |
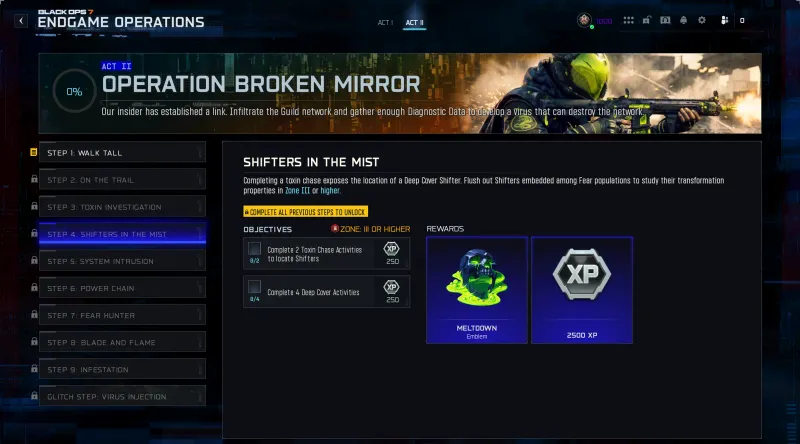
| 4 | Shifters In The Mist | Complete 2 Toxin Chase Activities to locate Shifters. Complete 4 Deep Cover Activities. | ”Meltdown” Emblem, 2,500 XP |
Steps 1-4 are manageable if you have been running Zone 3 content. The D.A.W.G. Escort in Step 1 is probably the most time-consuming since you need to babysit the dog through a full escort path while also getting 5 kills with the D.A.W.G. Scorestreak during a Strongbox Crack. Stack both objectives in the same run if you can.
Step 2 gives you a Restore Token early, which is smart. You are going to want insurance for the Nightmare Zone steps coming up.
Steps 5-6: Zone 4+
| Step | Name | Objectives | Rewards |
|---|---|---|---|
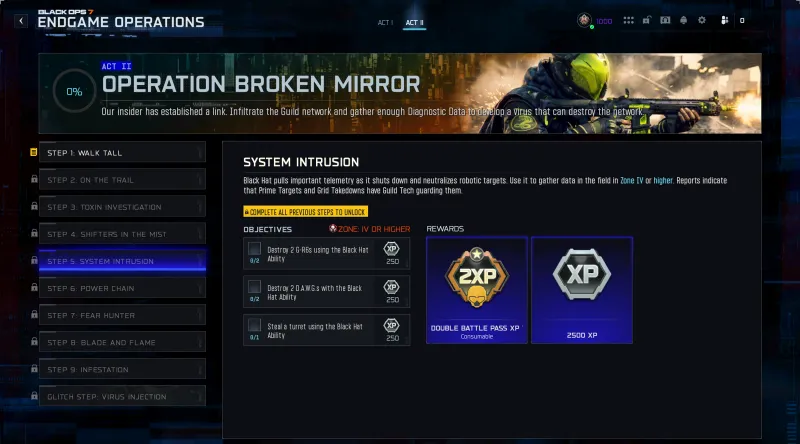
| 5 | System Intrusion | Destroy 2 G-R6s using Black Hat Ability. Destroy 2 D.A.W.G.s using Black Hat Ability. Steal turret using Black Hat Ability. | 1-hour Double Battle Pass XP Token, 2,500 XP |
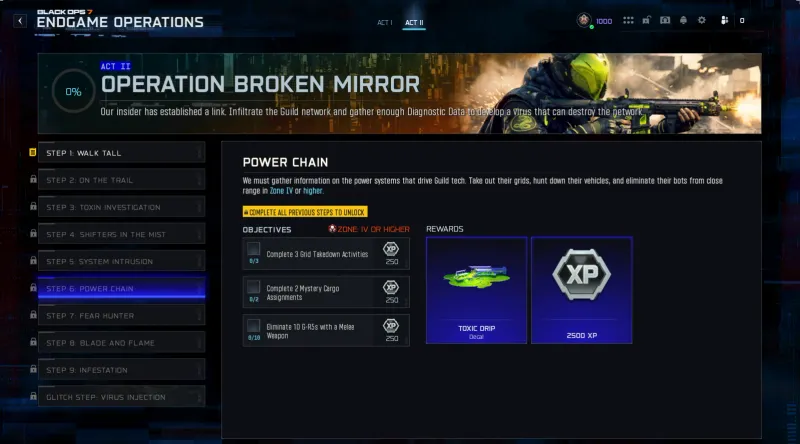
| 6 | Power Chain | Complete 3 Grid Takedown Activities. Complete 2 Mystery Cargo Assignments. Eliminate 10 G-R5s with Melee Weapon. | ”Toxic Drip” Large Decal, 2,500 XP |
Step 5 is all about the Black Hat Ability. You need it equipped before you start. The objective is to hack and destroy enemy tech: 2 G-R6 drones, 2 D.A.W.G.s, and steal a turret. If you do not have Black Hat unlocked, this step will force you to go earn it first.
Step 6 is where it gets spicy. Killing 10 G-R5s with a melee weapon in Zone 4 is no joke. The G-R5s hit hard and the melee range puts you in danger constantly. Bring a strong melee weapon and consider using the Aether Blade ability to close the gap safely.
Steps 7-10: Nightmare Zone
| Step | Name | Objectives | Rewards |
|---|---|---|---|
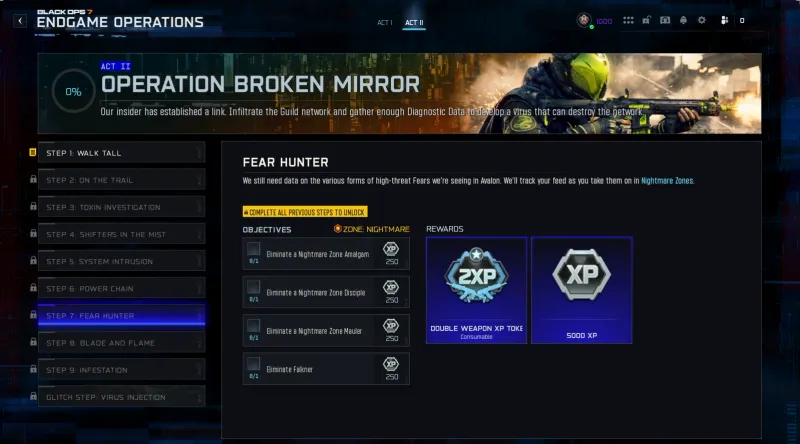
| 7 | Fear Hunter | Eliminate Nightmare Zone Amalgam. Eliminate Nightmare Zone Disciple. Eliminate Nightmare Zone Mauler. Eliminate Falkner. | 1-hour Double Weapon XP Token, 5,000 XP |
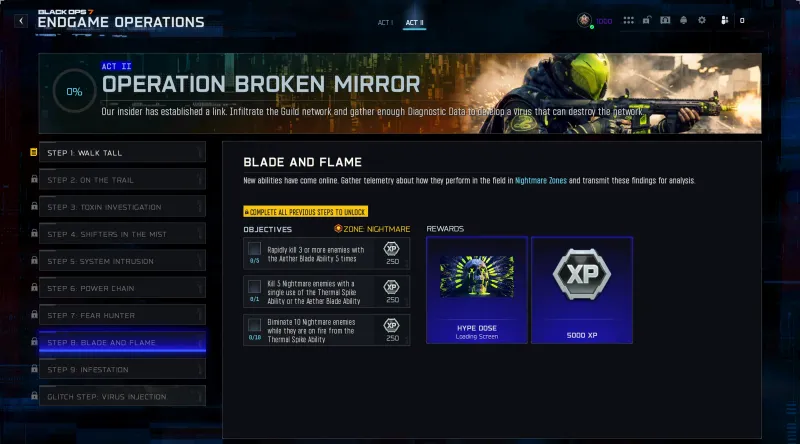
| 8 | Blade and Flame | Rapidly kill 3+ enemies with Aether Blade Ability 5 times. Kill 5 Nightmare enemies with single Thermal Spike or Aether Blade use. Eliminate 10 Nightmare enemies while burning from Thermal Spike. | ”Hype Dose” Loading Screen, 5,000 XP |
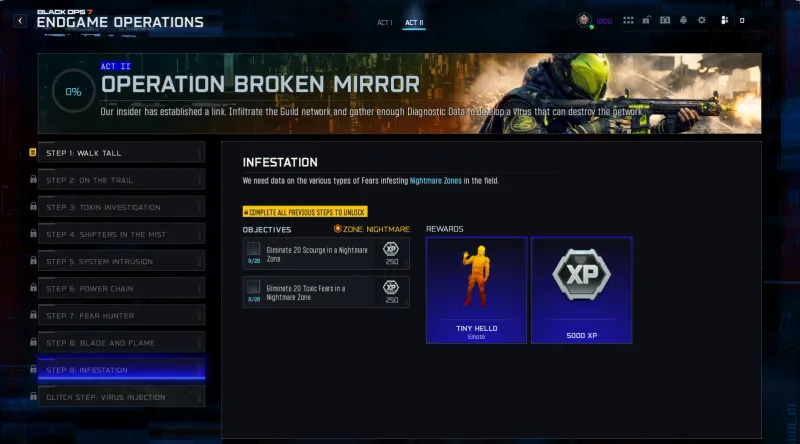
| 9 | Infestation | Eliminate 20 Scourge in Nightmare Zone. Eliminate 20 Toxic Fears in Nightmare Zone. | ”Tiny Hello” Emote, 5,000 XP |
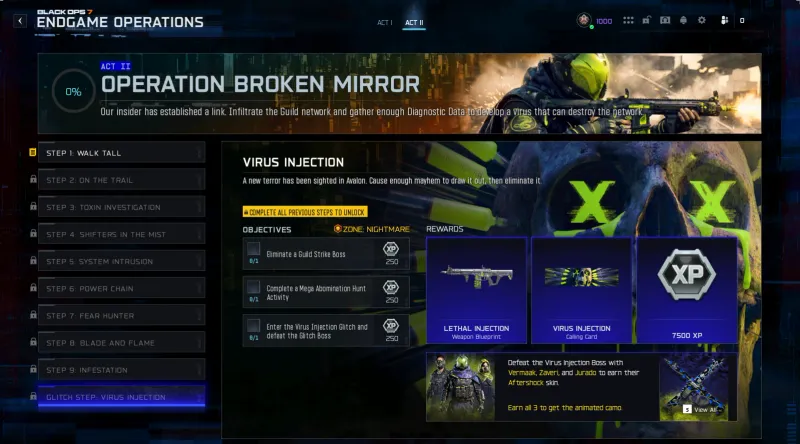
| 10 | Glitch Step: Virus Injection | Eliminate Guild Strike Boss. Complete Mega Abomination Hunt Activity. Enter Virus Injection Glitch and defeat boss. | ”Lethal Injection” Weapon Blueprint, “Virus Injection” Calling Card, 7,500 XP |
This is where Broken Mirror stops playing around. Steps 7-10 are all Nightmare Zone, which means your operator needs to be deep into CR 50+ territory with Exotic and Nightmare Skills already equipped. If you are not there yet, do not force it. A wipe here costs you real progress.
Step 7 is a boss gauntlet. Four named enemies need to go down: the Amalgam, Disciple, Mauler, and Falkner. These are Nightmare-tier enemies, so bring your strongest loadout and do not go solo unless you are confident.
Step 8 is designed around the new Thermal Spike ability. The objectives specifically require fire kills and Aether Blade multi-kills. Make sure you have both abilities ready before entering this step. Players on r/bo7endgame already reported that Thermal Spike is not unlockable through challenges until Week 6, even though Step 8 is available from day one. If you reach Step 8 before Week 6, grab Thermal Spike from a Mystery Cargo drop instead.
Step 9 is a grind: 40 total kills across two specific enemy types in Nightmare Zone. Straightforward but time-consuming.
Step 10 is the finale. More on that below.
One thing our team noticed immediately: the Nightmare Zone challenges that require killing specific enemy types are going to be competitive. Early on, multiple squads will be fighting over the same spawns. If you are grinding these in the first few days, expect to race other players for kills.
The Virus Injection Glitch Boss
Step 10 is where everything comes together. You need to complete three objectives in sequence:
- Eliminate the Guild Strike Boss in a Nightmare Zone
- Complete the Mega Abomination Hunt Activity (the Mega Abomination from Zombies now appears in Nightmare Zones)
- Enter the Virus Injection Glitch Fracture and defeat the Glitch Boss
The Virus Injection Glitch Fracture works like the Link Forger Glitch from Operation Poison Pill. After clearing the prerequisite bosses, a Glitch Fracture portal spawns. Enter it and you face waves of Nightmare-difficulty enemies culminating in the Glitch Boss fight.
If you have done the Link Forger Glitch before, expect a similar structure but harder. The Virus Injection boss is the payoff for the entire operation, and the rewards reflect that.
Defeating the Mega Abomination guarantees an Exotic Weapon Case drop after you beat the zone’s primary boss. This is the most reliable way to farm the new Pulsebreach and Reboot exotics.
Aftershock Skins and Camos
The real grind is completing the Virus Injection Glitch Boss with all three operators. Each one unlocks that character’s Aftershock operator skin, and the camos are tied to how many skins you collect.
| Requirement | Reward |
|---|---|
| Complete Virus Injection with Vermaak, Zaveri, or Jurado | That operator’s “Aftershock” skin |
| Unlock 1 Aftershock skin | ”Braincase” Weapon Camo |
| Unlock all 3 Aftershock skins | ”Neon Gallows” Animated Weapon Camo |
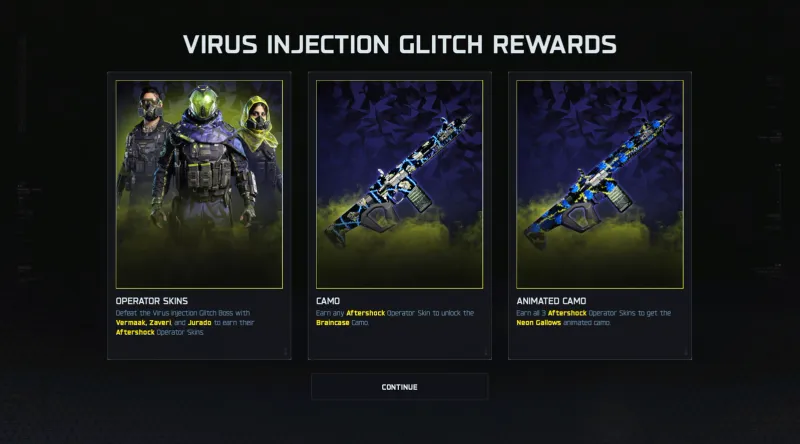
The Neon Gallows animated camo is the ultimate flex here. Getting it means beating the Virus Injection Glitch Boss three separate times, once with each operator, all at Nightmare difficulty. That is a serious time investment. If you are prioritizing one run, Vermaak is usually the safest choice for Endgame since the Surgeon skill track pairs well with solo survivability.
Honestly, Treyarch nailed the reward structure this time. Poison Pill rewards felt underwhelming for the effort required. Broken Mirror fixes that. The Aftershock skins actually look good, the Neon Gallows camo is worth chasing, and the calling cards are genuinely difficult to earn. This is how operations should work: real rewards behind real challenges, not participation trophies behind busywork.
Calling Card Challenges
Operation Broken Mirror adds 7 new calling cards through its own challenge track, separate from the 10-step operation. These are long-term grinds designed for dedicated Endgame players.
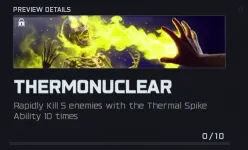
Thermonuclear
Rapidly kill 5 enemies with the Thermal Spike Ability 10 times.
Stack this while working on Step 8 (Blade and Flame) since both require Thermal Spike kills. Group enemies together and blast them in one Thermal Spike activation.

Underdog
Kill 100 Nightmare Zone enemies while under Combat Rating 30.
This one goes against every instinct. You need to enter Nightmare Zones with a low-level operator, which means you are going in without maxed skills or damage multipliers. Bring a squad and play support while your teammates deal the heavy damage.
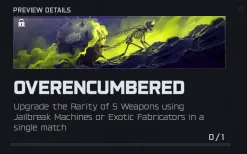
Overencumbered
Upgrade the rarity of 5 weapons using Jailbreak Machines or Exotic Fabricators in a single match.
Stay in a single run long enough to hit 5 rarity upgrades. Prioritize Jailbreak Machines early and save Exotic Fabricators for your main weapon. A long Zone 3-4 grind session should get you there.
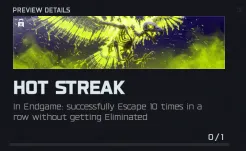
Hot Streak
In Endgame, successfully escape 10 times in a row without getting eliminated.
Pure patience. Play safe, extract early, and avoid risky content while working on this. One death resets the counter. Do not attempt the Glitch Fracture or Nightmare Zone bosses until this is done.
Rough Road
Kill 150 Zone 4 or higher enemies with the Blood Burner Ability.
The Blood Burner is a vehicle ability, so you need to be running enemies over or using the vehicle’s weaponry in Zone 4+. This is a long grind at 150 kills. Focus on dense spawn areas and keep the vehicle alive.

Juiced
In Endgame, earn 25,000 Power in a single match.
This rewards aggressive, high-efficiency runs. Focus on Zone 4 and Nightmare Zone assignments for the biggest Power gains. Chain activities without downtime and avoid dying, since death costs you progress.
Broken Mirror Master
Complete all Operation Broken Mirror challenges.
The ultimate calling card. Finishing all 6 challenges above unlocks this. Underdog and Hot Streak are the hardest ones to complete, so save those for last and knock out the grind challenges (Thermonuclear, Rough Road) first.
New Abilities and Exotic Weapons
Season 3 Reloaded adds several new tools to your Endgame arsenal. These are not locked behind Broken Mirror completion. They are available to all Endgame players from day one.
Thermal Spike (Major Ability)
Emits a powerful blast of flames that incinerates enemies. The flames persist in the area for a short time, creating a denial zone. Think of it like a more aggressive version of the Wild Fire field upgrade from Zombies. Step 8 of Broken Mirror has objectives built around Thermal Spike, so you will want to unlock and upgrade it before reaching that point.
Conductive Shot (Exotic Skill)
Occasionally fires tasers that stick to enemies and deal damage over time. Upgrades improve fire rate and add multi-target capability. This is an Exotic Skill, meaning you earn it from Glitch Fracture completions. Pair it with Shock Round weapons like the new Reboot pistol for extra synergy.
Wingman Unit (Nightmare Skill)
Multiple rapid kills spawn a drone that follows you and shoots nearby enemies. The final upgrade gives drone shots a chance to trigger a Shrapnel effect. Since this is a Nightmare Skill, you need to complete a Glitch Fracture to unlock it. The passive damage from the drone is solid for clearing trash mobs while you focus on objectives.
New Exotic Weapons
| Weapon | Type | Round Affinity | Notes |
|---|---|---|---|
| Pulsebreach | Burst Marksman Rifle | Shrapnel Rounds | High burst damage, good for picking off priority targets |
| Reboot | Semi-Auto Pistol | Shock Rounds | Versatile sidearm with crowd control potential |
Both drop from Exotic Weapon Cases. The most reliable source is the Mega Abomination, which guarantees a case drop when defeated. The Pulsebreach looks particularly promising as a secondary for players who prefer automatic primaries like the Torrent AR.
Tips for Completing Operation Broken Mirror
Broken Mirror is a marathon, not a sprint. Rushing it will get you killed, and dying in Nightmare Zone is expensive. Here is how to approach it without throwing away hours of progress.
Prepare Before You Start
- Combat Rating 30-40 minimum. Zone 3 is the entry point. If you are still in Zone 1-2 territory, finish Operation Poison Pill and grind your CR first.
- Unlock Black Hat. Step 5 requires it. Do not get stuck mid-operation because you forgot to unlock an ability.
- Equip Thermal Spike and Aether Blade. Step 8 specifically requires kills with both. Have them ready before you reach the Nightmare steps.
- Stock up on Restore Tokens. You get one from Step 2, but bring extras if you have them. The Nightmare Zone steps are punishing.
Squad Up for Steps 7-10
The Nightmare Zone steps are dramatically easier with a coordinated squad. The boss gauntlet in Step 7 and the Virus Injection Glitch in Step 10 are built for team play. If you are running solo, make sure your operator has strong survivability (Surgeon skill track) and at least one Exotic Skill for damage output. GNGWarzone’s prep guide recommends getting all three operators to CR 60+ with Exotic and Nightmare Skills before attempting the Virus Injection Glitch, and running the XR3 Ion with Shrapnel Rounds as your primary.
It is Designed to Last
Our mods who have been grinding Endgame since launch noticed something right away: Broken Mirror is not designed to be cleared in a weekend. Unlike Poison Pill, which higher-level players could rush through fairly quickly, Treyarch clearly built this operation to be a long-term grind. That is great news if you are a dedicated Endgame player. There is real content here, not just busywork. But if you are hoping to knock out the Neon Gallows camo in a day or two, adjust your expectations.
Prioritize Objectives Across Runs
You do not need to complete every step in a single run. Objectives carry over between matches, so focus on one or two per session. If a step has 3 activities and 2 assignments, knock out the activities in one run and the assignments in the next. Trying to force everything in one session leads to risky plays and avoidable deaths.
Farm the Mega Abomination
The Mega Abomination spawns in Nightmare Zones after you defeat the zone’s Strike Boss. Killing it guarantees an Exotic Weapon Case. Even if you are not on Step 10 yet, start farming these when you reach Nightmare Zone. The Pulsebreach and Reboot can make the final steps significantly easier.
Frequently Asked Questions
What is Operation Broken Mirror in BO7 Endgame?
Operation Broken Mirror is Act 2 of BO7 Endgame, released on April 30, 2026 with Season 3 Reloaded. It continues the JSOC vs. Guild storyline from Operation Poison Pill. Players gather diagnostic data to develop a virus that can destroy the Guild's C-Link mirror network. The operation has 10 linear steps and ends with the Virus Injection Glitch boss fight.
How many steps are in Operation Broken Mirror?
Operation Broken Mirror has 10 steps. Steps 1-4 require Zone 3 or higher, Steps 5-6 require Zone 4 or higher, and Steps 7-10 require Nightmare Zone. Each step has specific objectives and rewards that must be completed in order.
What zone do you need for Operation Broken Mirror in BO7?
Operation Broken Mirror starts at Zone 3 difficulty from Step 1, which is harder than Operation Poison Pill. Steps 5-6 bump up to Zone 4, and the final four steps (7-10) require Nightmare Zone. Make sure your operator is at least Combat Rating 30-40 before starting.
What is the Virus Injection Glitch in BO7 Endgame?
The Virus Injection Glitch is a new Glitch Fracture unlocked by completing Operation Broken Mirror. In Step 10, you enter the Glitch Fracture and face the Virus Injection Glitch Boss at Nightmare difficulty. Defeating it with each of the three operators (Vermaak, Zaveri, Jurado) unlocks Aftershock skins and weapon camos.
How do you unlock the Aftershock operator skin in BO7 Endgame?
Complete Operation Broken Mirror Step 10 and defeat the Virus Injection Glitch Boss with Vermaak, Zaveri, or Jurado. Each completion unlocks that operator's Aftershock skin. Unlocking one skin gives you the Braincase weapon camo. Unlocking all three gives you the Neon Gallows animated weapon camo.
What is the Thermal Spike ability in BO7 Endgame?
Thermal Spike is a new Major Ability added in Season 3 Reloaded. It emits a powerful blast of flames that incinerates enemies, and the flames persist in the area for a short time. It is especially effective in Steps 8-9 of Broken Mirror where several objectives require kills with fire damage.
Is BO7 Endgame free to play in 2026?
Yes. Endgame is free to play for a limited time during Season 3 Reloaded. You can access it from the main Call of Duty menu or through Warzone without owning Black Ops 7. This includes Operation Broken Mirror and all other Endgame content.
What new exotic weapons were added in BO7 Season 3 Reloaded?
Two new exotic weapons were added: the Pulsebreach, a burst marksman rifle with Shrapnel Round affinity, and the Reboot, a semi-auto pistol with Shock Round affinity. These drop from Exotic Weapon Cases earned by defeating the Mega Abomination in Nightmare Zones.
Working through Broken Mirror or stuck on a specific step? Join 50,000+ players on the COD Central Discord to find Endgame squads, share strategies, and discuss the new content. We have dedicated LFG channels for every Endgame activity.
