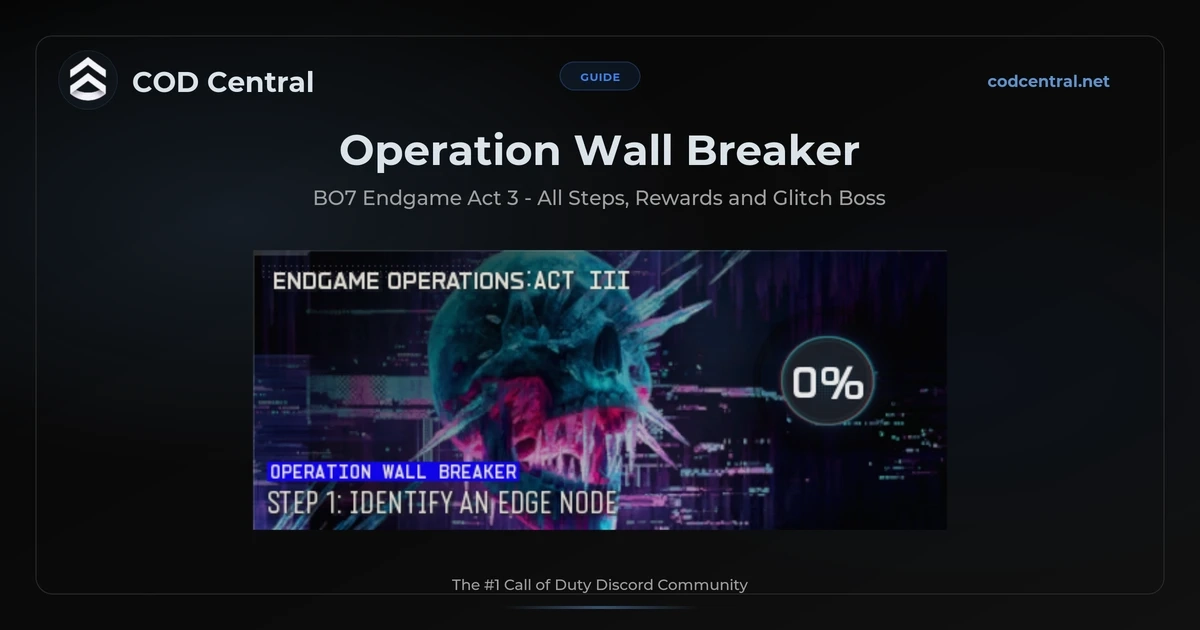
Operation Wall Breaker is Act 3 of BO7 Endgame, released June 4, 2026 with Season 04. It is the final chapter of the JSOC vs. Guild storyline, and it ends with the Command Killer Glitch Fracture. If you played through Operation Broken Mirror, this is where that story wraps up.
Good news: Wall Breaker is more accessible than Broken Mirror. It starts at Zone I instead of Zone III, so lower-level operators can actually begin the operation right away. The difficulty scales up through Zone II, III, IV, and eventually Nightmare Zone for the final Glitch Step.
Our team jumped in on launch day and honestly, this is better than Broken Mirror in almost every way. The pacing feels tighter, the zone progression makes more sense, and the Command Killer Glitch is a more interesting boss encounter. The only real frustration is competing with other players for contracts in Zone III, not the enemies themselves.
- 9 steps + Command Killer Glitch Step (Nightmare Zone finale)
- Starts at Zone I, scales up to Zone IV and Nightmare
- Final boss is the Zursa bear. 6 waves before the boss fight
- Complete as 50/50, Razer, and Falkner for Shatter Shock skins and the Visitors animated camo
- Endgame is free to play through end of Season 05
What is Operation Wall Breaker?
Story-wise, a Command Node is blocking Karma’s virus from attacking the Guild’s network. Your job is to scour Avalon, breach network hubs across different locations, and gather enough Mapping Data to locate and destroy the node. Once you crack it open, you enter the Command Killer Glitch Fracture and finish the job.
Gameplay-wise, each step sends you to a different area of the map with a mix of activities, assignments, and kill objectives. Every step ends with “Locate and Breach the Guild Network Hub,” which serves as the narrative thread tying everything together. The structure is straightforward: clear objectives, breach the hub, move to the next location. For a video walkthrough, GNGWarzone’s complete guide covers every step, and dkdynamite’s walkthrough focuses on the Glitch Boss fight.
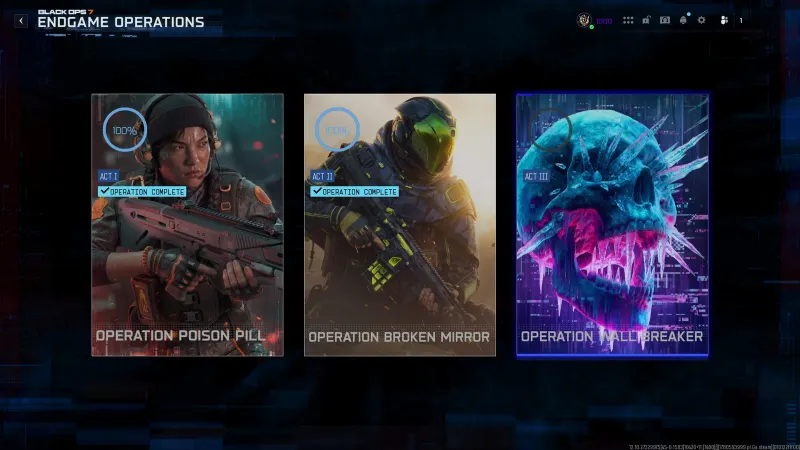 Click to enlarge All three Endgame operations: Poison Pill (Act I), Broken Mirror (Act II), and Wall Breaker (Act III)
Unlike Broken Mirror, you do not need a high-level operator to start. Zone I is accessible for everyone. If you have completed Broken Mirror, you will breeze through the first few steps.
All 9 Steps and Rewards
Operation Wall Breaker has 9 steps that must be completed in order, plus the Command Killer Glitch Step as the finale. Here is every objective and reward, organized by zone requirement. All data verified from our in-game screenshots on launch day.
Steps 1-2: Zone I
| Step | Name | Objectives | Rewards |
|---|---|---|---|
| 1 | Identify an Edge Node | Complete the Command Center Activity in the Old Arsenal area. Kill 20 enemies with Critical Kills in the Old Arsenal area. Locate and Breach the Guild Network Hub in the Old Arsenal area. | ”Brain Freeze” Weapon Charm, 1,000 XP |
| 2 | Trace the Network | Complete an Activity in the Cliff Town area. Complete an Assignment in Zone 1. Eliminate 25 Human enemies in the Cliff Town area. Locate and Breach the Guild Network Hub in the Cliff Town area. | Restore Token, 1,000 XP |
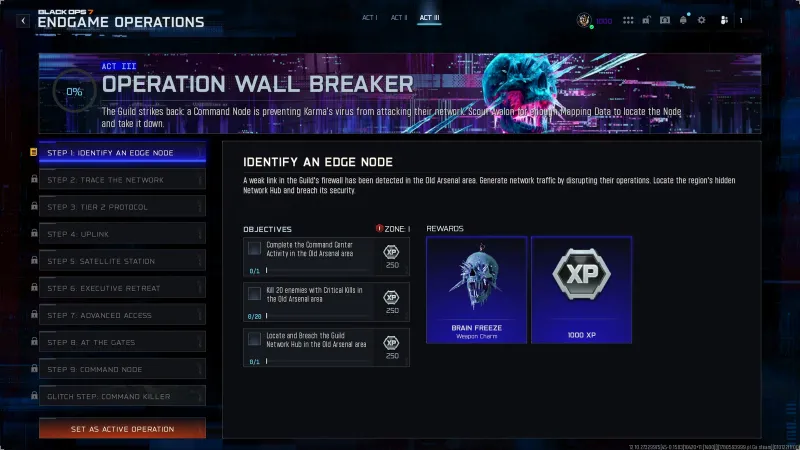 Click to enlarge Step 1: Identify an Edge Node kicks off the operation in the Old Arsenal at Zone I difficulty
Steps 1-2 are Zone I, which means any operator can start Wall Breaker immediately. The Critical Kills requirement in Step 1 means headshots. If you are not landing them consistently, slow down and line up your shots.
The Command Center for Step 1 is in the southern end of Zone I, near the Link Forge Glitch Fracture location. To find the Network Hub, follow the signal tracker on your HUD until it turns strong and green, then interact with the console.
Step 2 gives you a Restore Token early, just like Broken Mirror did. The Assignment in Step 2 can be completed anywhere on the map, not just in Cliff Town. HVT Assignments are the fastest option.
 Click to enlarge Step 2: Trace the Network rewards a Restore Token for clearing Cliff Town objectives
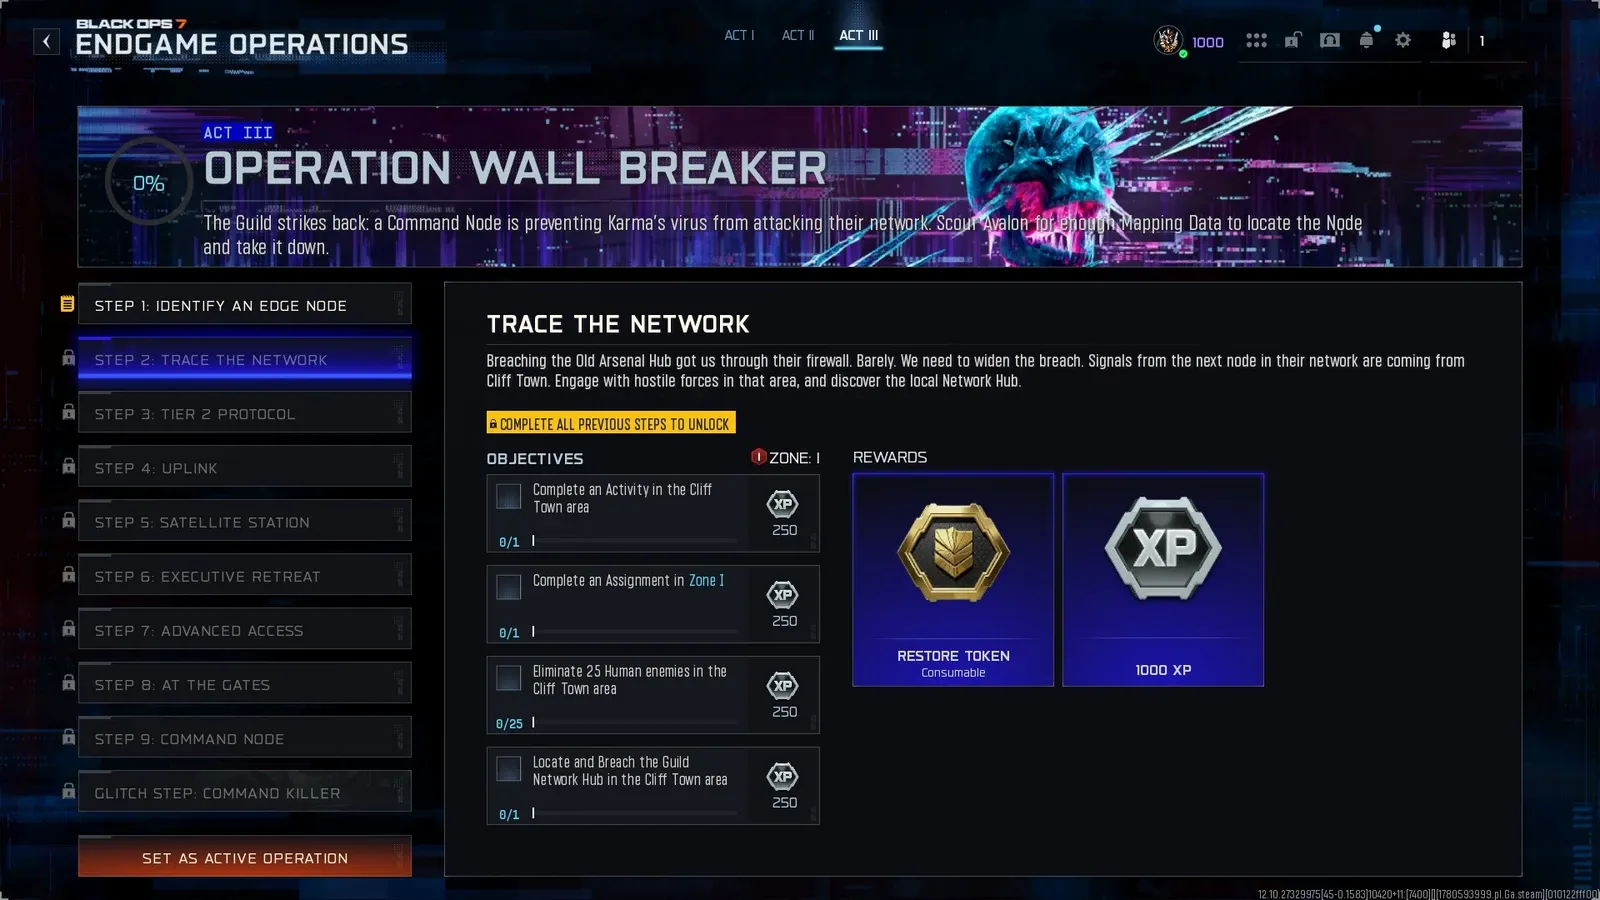
Steps 3-5: Zone II
| Step | Name | Objectives | Rewards |
|---|---|---|---|
| 3 | Tier 2 Protocol | Complete 2 Activities near the Excavation Site area. Complete a Quadcore Site Activity in the Colosseum area. Eliminate 4 Special enemies in the Colosseum area. Locate and Breach the Guild Network Hub in the Colosseum area. | Double XP Token, 1,000 XP |
| 4 | Uplink | Complete the Command Center Activity in the Heliport area. Complete a D.A.W.G. Escort Assignment in the Heliport area. Kill 20 enemies while in a Vehicle in the Heliport area. Locate and Breach the Guild Network Hub in the Heliport area. | ”Splitter” Emblem, 2,500 XP |
| 5 | Satellite Station | Complete Command Center Activity in the Listening Post area. Destroy a VTOL in the Listening Post area. Eliminate 50 Human enemies in the Listening Post area. Locate and Breach the Guild Network Hub in the Listening Post area. | Double Battle Pass XP Token, 2,500 XP |
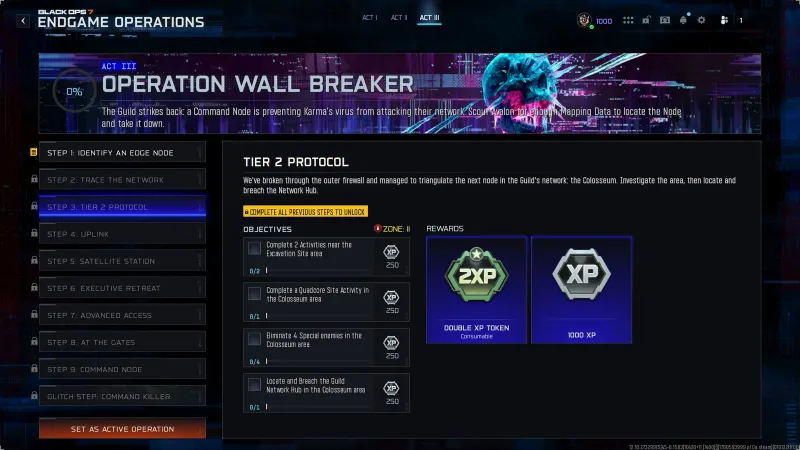 Click to enlarge Step 3: Tier 2 Protocol moves the action to the Excavation Site and Colosseum in Zone II
Zone II steps introduce more variety. Step 4 has a D.A.W.G. Escort plus vehicle kills, which means you need to find a vehicle in the Heliport area and run enemies over or use mounted weapons. Step 5 requires 50 Human kills and a VTOL destroy at the Listening Post, which is the grindiest step in this zone bracket.
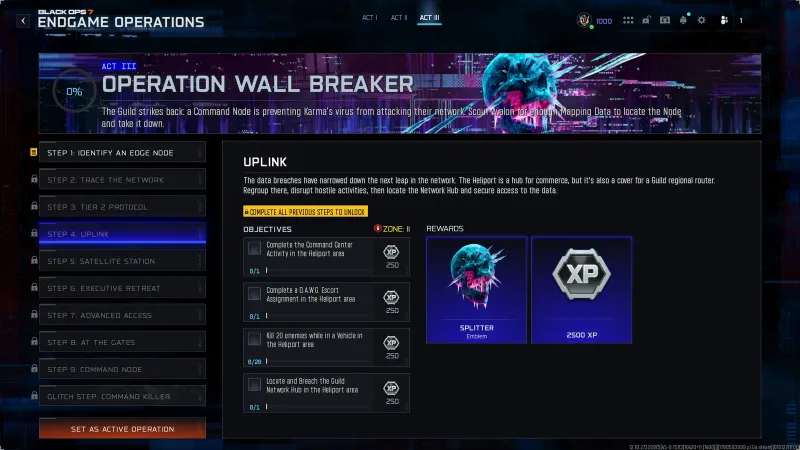 Click to enlarge Step 4: Uplink requires vehicle kills in the Heliport area, plus a D.A.W.G. Escort Assignment
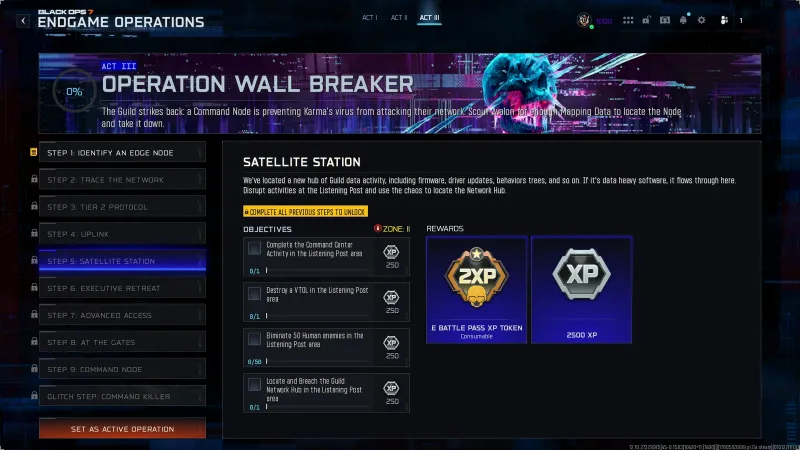 Click to enlarge Step 5: Satellite Station at the Listening Post, with 50 Human kills and a VTOL to destroy
Steps 6-8: Zone III
| Step | Name | Objectives | Rewards |
|---|---|---|---|
| 6 | Executive Retreat | Complete 2 Activities in the Resorts area. Complete an HVT Assignment in the Resorts area. Kill 5 Special enemies with Critical Kills in the Resorts area. Locate and Breach the Guild Network Hub in the Resorts area. | ”Frost Beast” Decal, 2,500 XP |
| 7 | Advanced Access | Complete a Toxin Field Activity in the High Town area. Complete 2 Activities in the Trinity Stadium area. Kill 10 enemies with Equipment in the High Town area. Locate and Breach the Guild Network Hub in the High Town area. | Double Weapon XP Token, 5,000 XP |
| 8 | At the Gates | Complete the Command Center Activity in the Coastal Security area. Eliminate 50 Fears in the Coastal Security area. Eliminate 3 Elite enemies in the Coastal Security area. Locate and Breach the Guild Network Hub in the Coastal Security area. | ”Fractal Cry” Loading Screen, 5,000 XP |
This is where it gets real. Zone III is a significant difficulty jump, and our team noticed it immediately. Step 6 asks for Critical Kills on Special enemies in the Resorts, which requires precision under pressure. Step 7 needs 10 Equipment kills in High Town, so make sure you have strong lethals or tacticals equipped. Step 8 is the toughest of the three: 50 Fears and 3 Elites in Coastal Security is no joke, especially with other squads hunting the same targets.
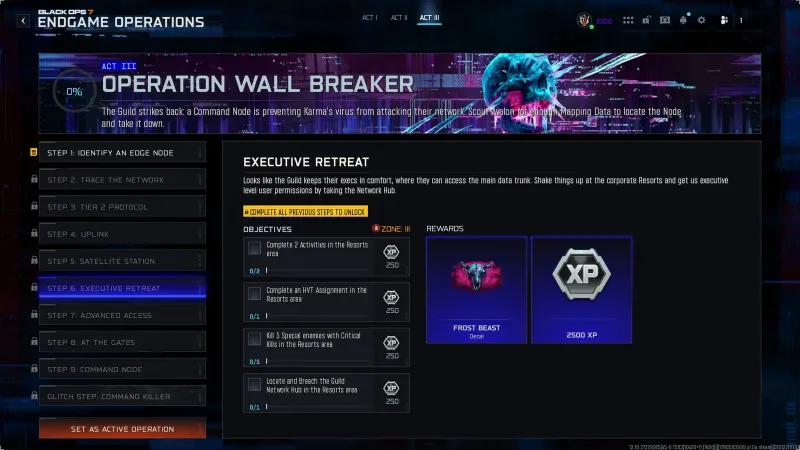 Click to enlarge Step 6: Executive Retreat starts the Zone III portion at the Resorts
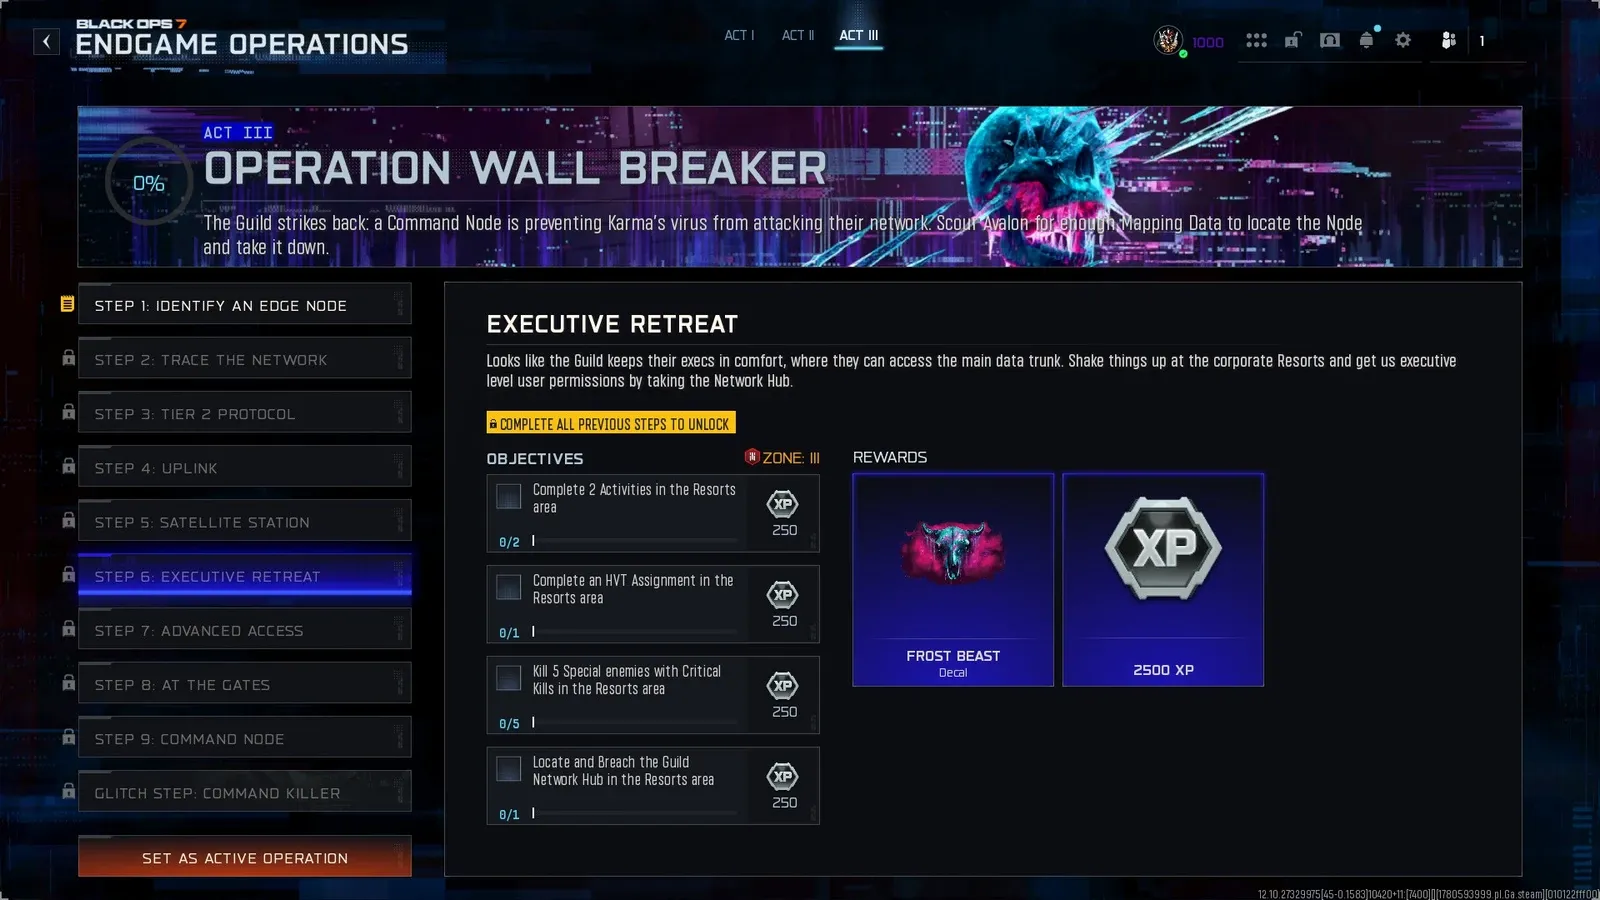
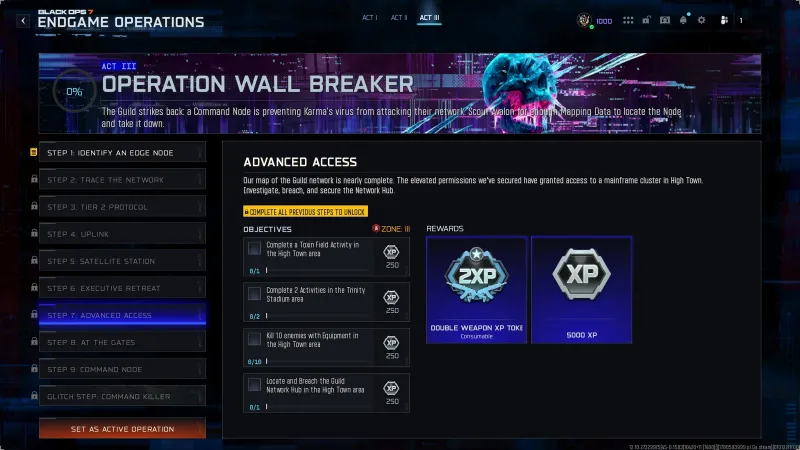 Click to enlarge Step 7: Advanced Access in High Town and Trinity Stadium
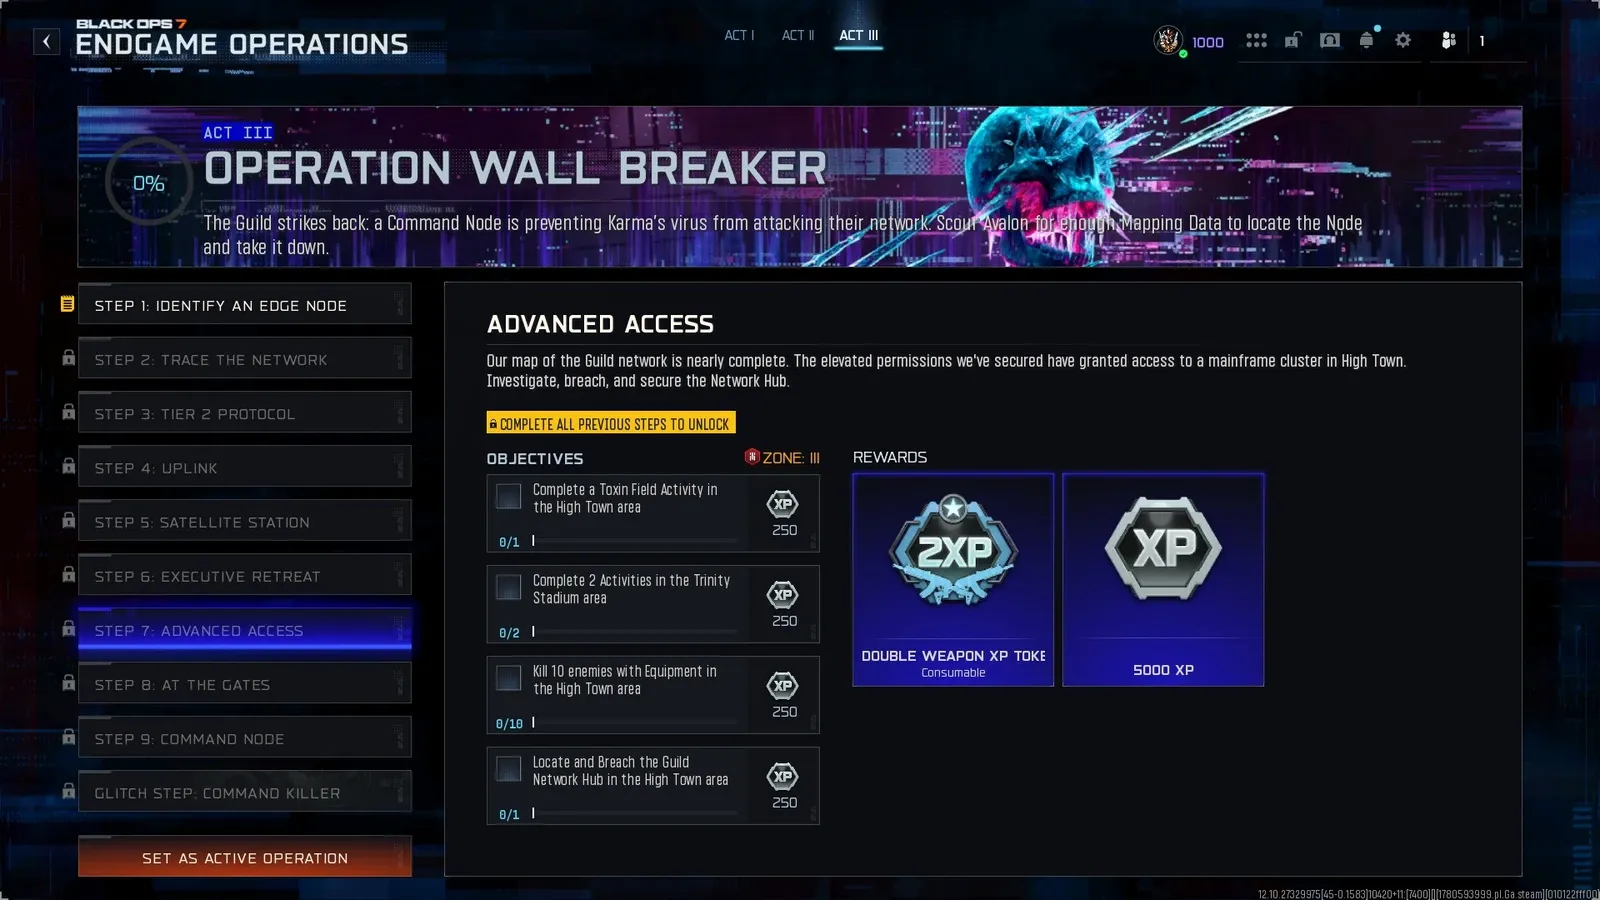
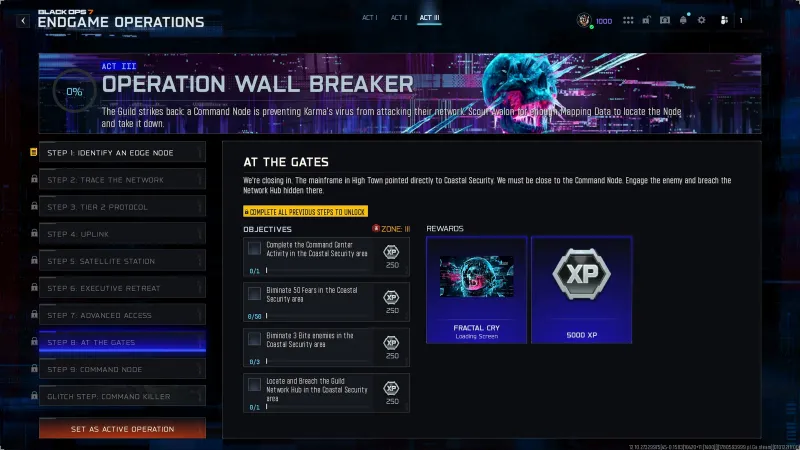 Click to enlarge Step 8: At the Gates, the toughest Zone III step with 50 Fears and 3 Elite enemies
Step 9: Zone IV
| Step | Name | Objectives | Rewards |
|---|---|---|---|
| 9 | Command Node | Complete a Surveillance Control Activity in the Low Town area. Complete a Quadcore Site Activity in the Firing Range area. Locate and Breach the Guild Network Hub in the Low Town area. Locate and Breach the Guild Network Hub in the Firing Range area. | ”Forehead Slap” Emote, 5,000 XP |
 Click to enlarge Step 9: Command Node sends you to two locations to isolate the final node
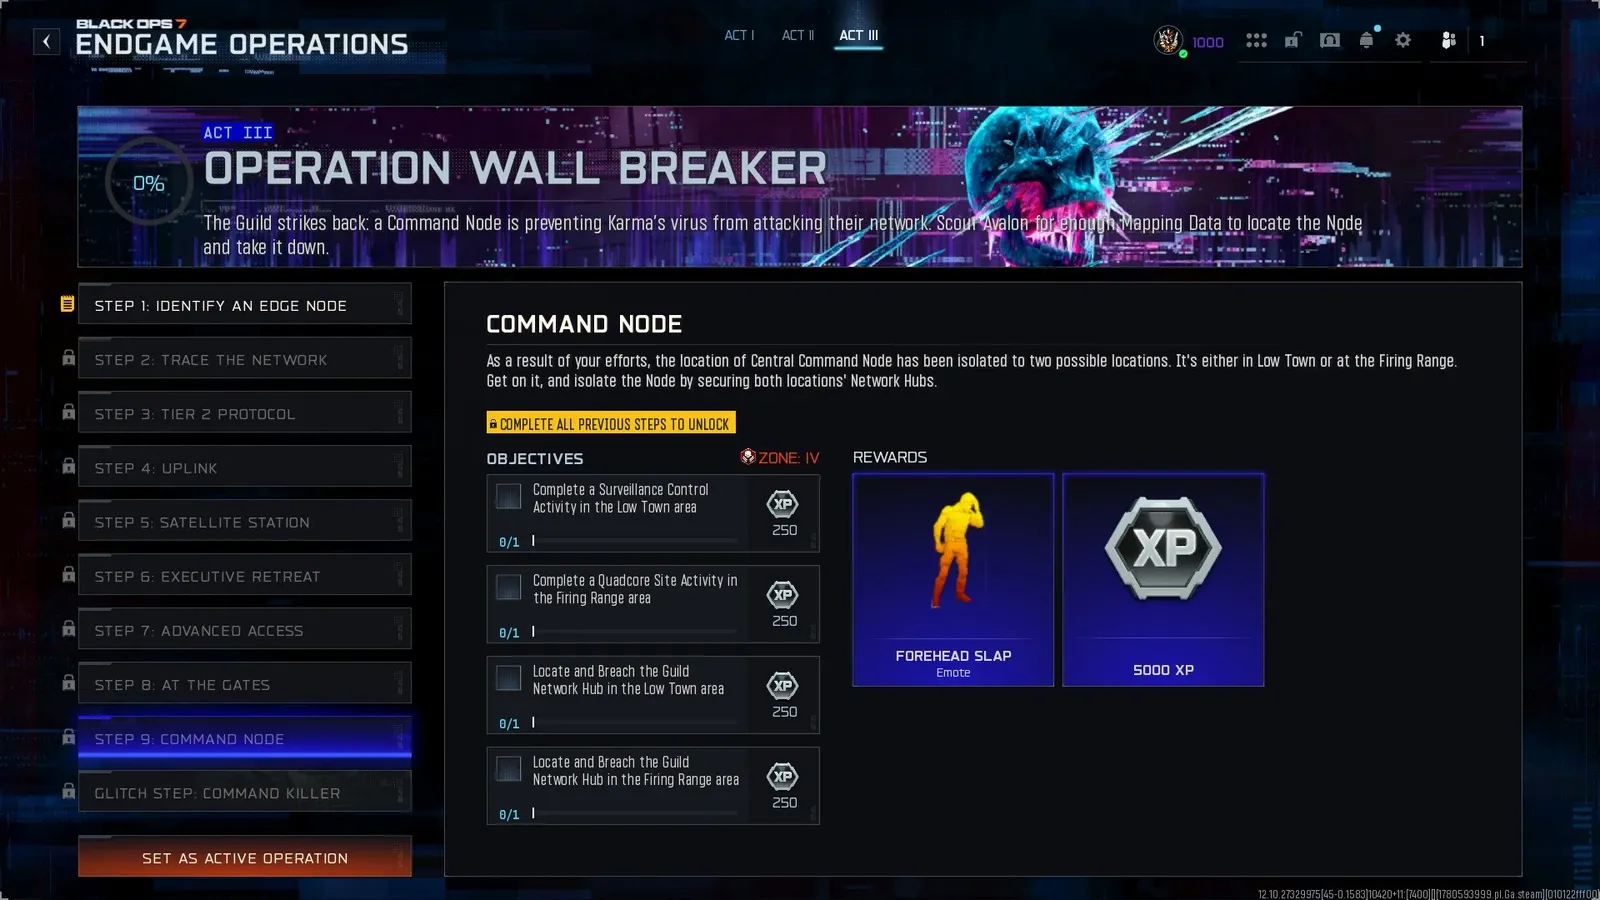
Step 9 is interesting because it splits into two locations. The Command Node has been isolated to either Low Town or the Firing Range, so you need to breach Network Hubs at both. No kill objectives here, just activities and breaches. Zone IV difficulty keeps you on your toes, but the lack of grind kills makes this step feel quicker than the Zone III ones.
The Command Killer Glitch
After clearing all 9 steps, the Command Killer Glitch Step opens. This is the grand finale of the entire Endgame storyline.
| Step | Name | Objectives | Rewards |
|---|---|---|---|
| G | Command Killer | Complete a Possessed Convoy Activity. Enter the Command Killer Glitch and defeat the Glitch Boss. | ”Cold Shoulder” Weapon Blueprint, “Terms of Disservice” Calling Card, 7,500 XP |
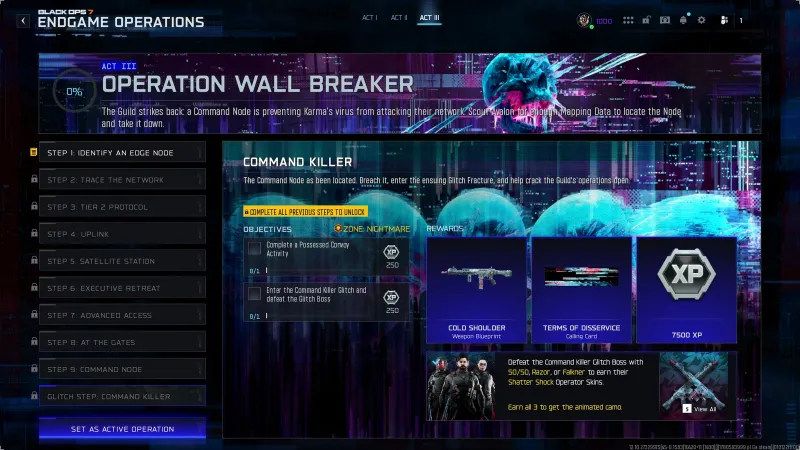 Click to enlarge The Command Killer Glitch Step: complete a Possessed Convoy, then face the Glitch Boss at Nightmare difficulty
The Possessed Convoy is a new Season 04 activity where you take out a Guild Convoy. After completing it, the Glitch Fracture portal spawns in Hightown. Enter it and you face the Command Killer Glitch Boss at full Nightmare difficulty.
The Glitch Fracture portal spawns in Hightown after completing the Possessed Convoy. Inside, you face 6 waves across 3 sectors, each with a different environment. After clearing both waves in a sector, you move to the next one.
| Wave | Sector | Objective | Notes |
|---|---|---|---|
| 1 | Underground | Tube Defense | Defend the central tube from Fear zombies, spider enemies, and Guild soldiers in a dark underground arena |
| 2 | Underground | Amalgam Elite | An Amalgam spawns with a health bar. Focus fire while managing surrounding enemies |
| 3 | Snow | Zone Defense | Defend tubes in a snowy outdoor area. Drones and ground enemies both attack |
| 4 | Snow | O.S.C.A.R. Variant | A modified O.S.C.A.R. robot spawns as the HVT. Tougher than the Amalgam, focus burst damage |
| 5 | Forest/Bunker | Multi-Zone Capture | Capture multiple zones in sequence across a forest, river, and underground bunker with a capture console |
| 6 | Forest/Bunker | Zursa Boss | The Zursa spawns immediately. At 50% health, beehives appear and the Zursa becomes immune until all beehives are destroyed. Same at 25% health |
If you played through the Virus Injection Glitch in Broken Mirror, expect a similar format but harder. Our team found that having at least one squad member helps significantly, especially since you need to clear this multiple times for all Shatter Shock skins. Note that the XR3 Ion was nerfed hard at the start of Season 04, so do not count on it as your primary weapon.
Getting the Visitors animated camo requires completing the Glitch as 50/50, Razer, and Falkner. That is 3 separate clears at Nightmare difficulty. Having a reliable teammate makes this grind much more manageable.
Shatter Shock Skins and Camos
Just like Broken Mirror had the Aftershock skins, Wall Breaker has the Shatter Shock set. You earn a skin by completing the Command Killer Glitch Fracture while playing as a specific operator. The three operators with Shatter Shock skins are 50/50, Razer, and Falkner. You need to run the Glitch Fracture once per operator to collect all three.
| Requirement | Reward |
|---|---|
| Complete Command Killer Glitch as 50/50, Razer, or Falkner | That operator’s “Shatter Shock” skin |
| Unlock 1 Shatter Shock skin | ”Decay” Weapon Camo |
| Unlock all 3 Shatter Shock skins | ”Visitors” Animated Weapon Camo |
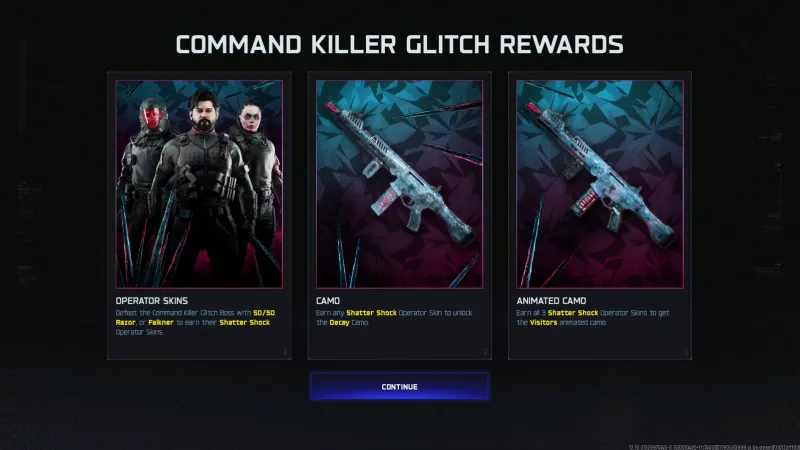 Click to enlarge Command Killer Glitch Rewards: Shatter Shock operator skins, Decay camo, and the Visitors animated camo
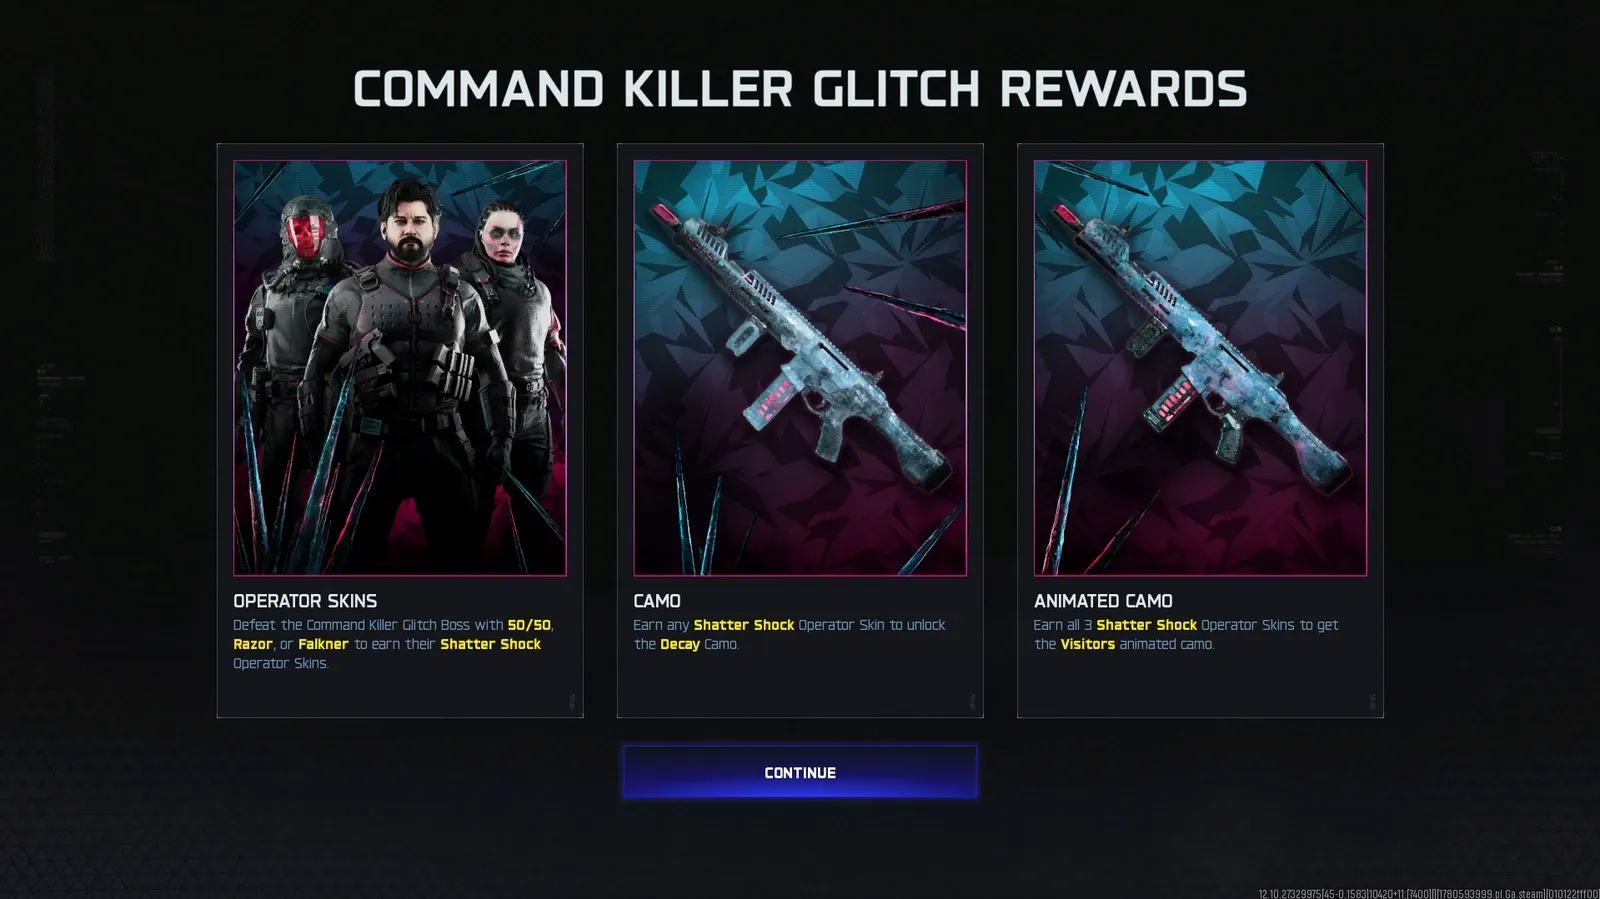
The Visitors animated camo is the big chase item. You need all 3 Shatter Shock skins, which means completing the Glitch Fracture as 50/50, Razer, and Falkner in separate runs. Make sure those operators are fully leveled before attempting the Glitch at Nightmare difficulty.
Tips for Completing Operation Wall Breaker
Wall Breaker is more accessible than Broken Mirror, but the later steps still demand preparation. Here is how to approach it efficiently.
The Early Steps Are Free XP
Steps 1-5 are Zone I and II. If you have played any Endgame content before, these are warmup rounds. Do not overthink them. Blast through them for the XP tokens and Restore Token, then slow down for Zone III.
Zone III Is the Real Start
Steps 6-8 are where most players will feel the difficulty spike. Critical Kills on Special enemies, Equipment kills, and clearing 50 Fears all require specific loadout preparation. Make sure your Equipment is leveled up before Step 7, and bring crowd-control abilities for Step 8.
Contract Competition Is the Biggest Obstacle
Our team noticed this immediately on launch day: the hardest part of Wall Breaker is not the enemies, it is other players. Everyone is trying to complete the same contracts and activities at the same time. If you are struggling to find available activities, try playing during off-peak hours or rotating to less popular areas within the same zone.
Step 9 Has Two Breach Locations
Do not miss this. Step 9 requires breaching Network Hubs in both Low Town and the Firing Range. Completing just one will not finish the step. Plan your route to hit both areas in a single run if possible.
Prepare for Multiple Glitch Boss Runs
If you want the Visitors animated camo, you need to complete the Command Killer Glitch as all three operators: 50/50, Razer, and Falkner. That means 3 separate clears at minimum, so make sure all three are leveled up before you start.
Gear Up Before the Glitch Step
The Command Killer fight is at Nightmare difficulty. A Combat Rating of at least 50 is recommended. Bring the Grappling Hook for mobility and a high-damage ability like War Machine or Crash Cart for revives. The Reboot with grenade bullets is particularly effective for the early waves.
Do Not Prestige Before Completing the Operation
If you are considering Operator Prestige, finish Wall Breaker and the Command Killer Glitch first. Prestiging resets your Combat Rating, skills, and weapon rarities. You do not want to attempt Nightmare difficulty with a fresh operator. Complete all 3 Shatter Shock runs, then prestige afterward.
Frequently Asked Questions
What is Operation Wall Breaker in BO7 Endgame?
Operation Wall Breaker is Act 3 of BO7 Endgame, released June 4, 2026 with Season 04. It is the final chapter of the JSOC vs. Guild storyline. Players hunt down Mapping Data across Avalon to locate and destroy a Command Node that is blocking Karma's virus. The operation has 9 steps plus a final Glitch Step.
How many steps are in Operation Wall Breaker?
Operation Wall Breaker has 9 regular steps plus the Command Killer Glitch Step as the finale. Steps 1-2 are Zone I, Steps 3-5 are Zone II, Steps 6-8 are Zone III, Step 9 is Zone IV, and the Glitch Step is Nightmare Zone.
What zone do you need for Operation Wall Breaker in BO7?
Wall Breaker starts at Zone I, which is much easier than Operation Broken Mirror (which started at Zone III). The difficulty ramps up gradually through Zone II, III, and IV, with the final Glitch Step requiring Nightmare Zone.
What is the Command Killer Glitch Fracture in BO7 Endgame?
The Command Killer Glitch Fracture is the final boss encounter unlocked after completing all 9 steps of Operation Wall Breaker. You need to complete a Possessed Convoy Activity first, then enter the Glitch Fracture in Hightown. Inside, you face 6 waves across 3 sectors (underground, snow, forest/bunker) including tube defense, an Amalgam Elite, an O.S.C.A.R. variant, multi-zone capture, and the Zursa bear boss. The Zursa becomes immune at 50% and 25% health until you destroy beehives that spawn around the area.
How do you unlock the Shatter Shock operator skins in BO7 Endgame?
Complete the Command Killer Glitch Fracture while playing as 50/50, Razer, or Falkner. Each operator has their own Shatter Shock skin. Unlocking one skin gives you the Decay weapon camo. Unlocking all three gives you the Visitors animated weapon camo. You need to run the Glitch Fracture once per operator.
What rewards do you get from Operation Wall Breaker?
Rewards across all steps include the Brain Freeze weapon charm, Splitter emblem, Frost Beast decal, Fractal Cry loading screen, Forehead Slap emote, various XP tokens, and over 30,000 total XP. The final Glitch Step awards the Cold Shoulder weapon blueprint, Terms of Disservice calling card, and 7,500 XP.
Is Operation Wall Breaker harder than Broken Mirror?
Wall Breaker is easier to start since it begins at Zone I instead of Zone III. The difficulty ramps up gradually, with the real challenge coming at Zone III and above. The biggest obstacle is competing with other players for contracts and activities in the higher zones, especially in the first weeks.
Is BO7 Endgame free to play in Season 4?
Yes. Endgame's free-to-play period has been extended through the end of Season 05. You can access it from the main Call of Duty menu without owning Black Ops 7. This includes Operation Wall Breaker and all other Endgame content.
What Combat Rating do you need for Operation Wall Breaker?
Steps 1-2 only require Zone I, so any CR can start. Steps 3-5 need Zone II, Steps 6-8 need Zone III, and Step 9 needs Zone IV. The final Command Killer Glitch Step is at Nightmare difficulty, so a CR of at least 50 is recommended for that fight.
What is the best loadout for the Command Killer Glitch Boss in BO7?
Bring the Grappling Hook ability for mobility during the wave phases. War Machine or similar high-damage equipment helps with burst damage on the Zursa boss. Crash Cart is useful if you are playing in a squad for quick revives. Make sure your weapons are at least Legendary rarity before attempting Nightmare difficulty.
For more Endgame coverage, the official Season 04 announcement covers all the new content, and the Endgame wiki page is a solid reference for the mode’s systems.
Working through Wall Breaker or stuck on a specific step? Join 50,000+ players on the COD Central Discord to find Endgame squads, share strategies, and discuss the new Season 04 content.
