
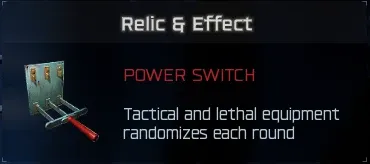
The Power Switch is a Grim tier relic on Totenreich that randomizes your tactical and lethal equipment every round. It was one of the last Totenreich relics to be discovered, and the unlock process is more involved than most. You need a sniper scope to read deer skull totems, precise tomahawk throws to trigger the trial portal, and then survive three waves of fire trap kills inside the trial itself.
- Cursed Mode Tier 1, round 20+, bring a sniper with a scope and tomahawks
- Scope 4 deer skull totems to find the correct order (1-4 skulls)
- Tomahawk 4 bear skin rugs in that order to spawn the trial portal
- Enter the portal and kill 3 waves of zombies using fire traps
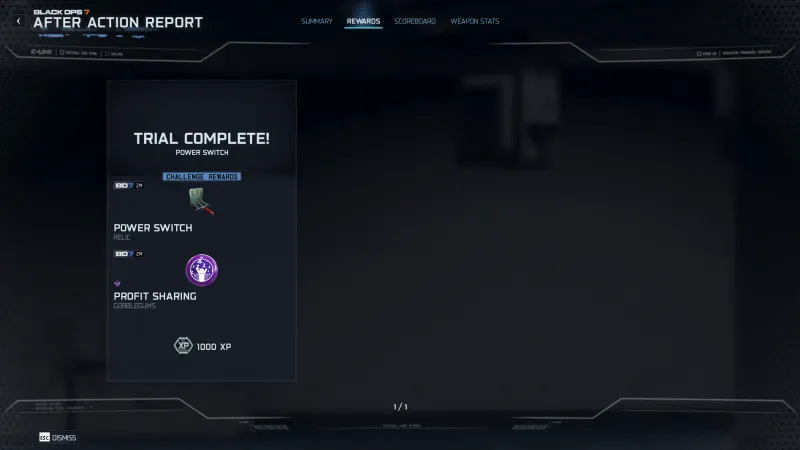
- Reward: Power Switch relic + Profit Sharing Cobalt Eclipse + 1,000 XP
We completed this relic on our own playthrough and documented every step. The totems randomize each game, so you cannot memorize a fixed order. You need to check them every time. Here is the full breakdown with our screenshots and the annotated minimap showing every location.
Requirements
Before you can start the Power Switch trial, you need these three things ready.
| Requirement | Details |
|---|---|
| Cursed Mode Tier 1 | The Power Switch is a Grim tier relic. You must have Cursed Mode Tier 1 active on Totenreich. |
| Round 20+ | Grim relic trials become available from round 20 onward. |
| Sniper with Scope | You need a high zoom scope to read the deer skull totems from a distance. The Shadow sniper is available as a wall buy on the map (see below). Make sure your loadout build includes a scope attachment. |
| Tomahawks | Your lethal equipment must be tomahawks. You use these to hit the bear skin rugs in the correct order. |
Set up your Zombies loadout before starting the match. Make sure your sniper class has a high zoom scope and that tomahawks are selected as your lethal equipment.
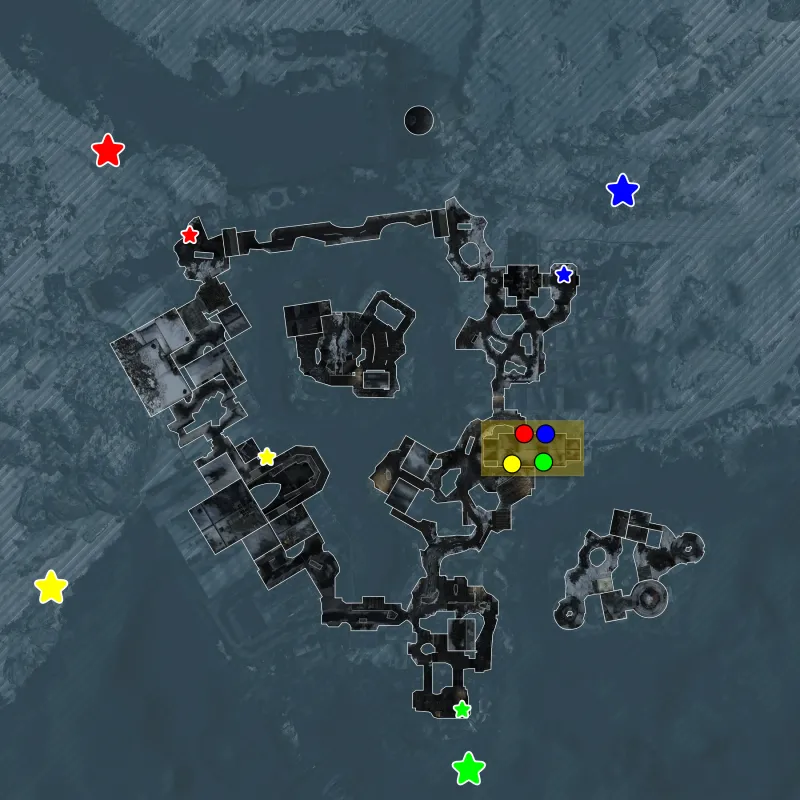
Minimap Reference
This annotated minimap shows every location involved in the Power Switch relic. Use it to plan your route before starting. Click the map to enlarge it.
 Click to enlarge
| Marker | Meaning |
|---|---|
| Small colored stars | Where to stand when using your sniper scope |
| Large colored stars | Where to aim. This is the totem location you are scoping |
| Colored dots (red, blue, yellow, green) | Bear skin rug positions. The colors help you track which rug matches which totem |
Match each colored star pair (stand + aim) to find the totem, count the deer skulls, then use the matching colored dot to know which bear rug to tomahawk in that order position.
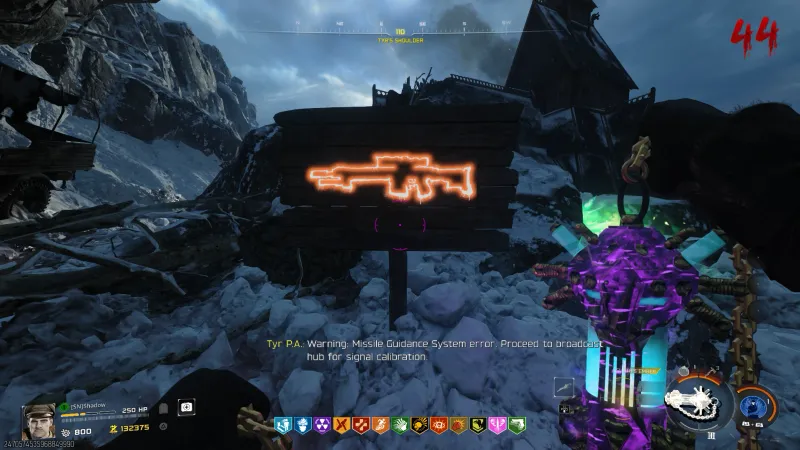
Step 1: Scope the Deer Skull Totems
Four deer skull totems are placed at fixed locations around the map. Each totem displays a different number of deer skulls: one has 1 skull, another has 2, another has 3, and the last has 4. These numbers tell you the correct order for the tomahawk step.
You need a sniper rifle with a high zoom scope to read the totems from where you are standing. The Shadow sniper from the wall buy works perfectly for this. Without a scope, the totems are too far away to count the skulls.
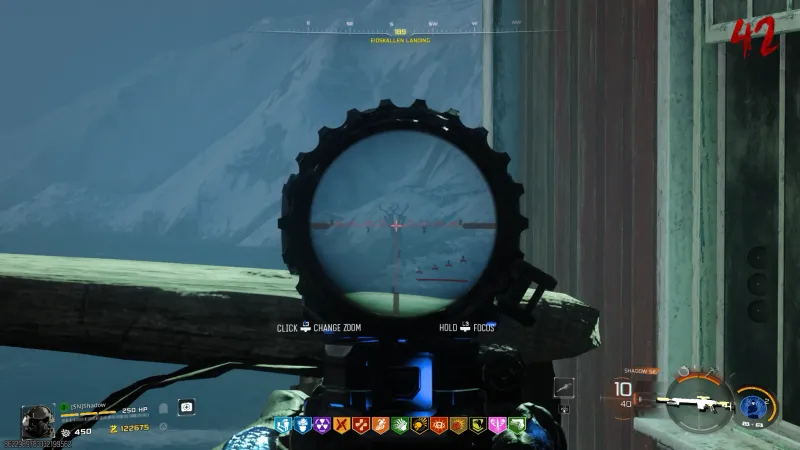

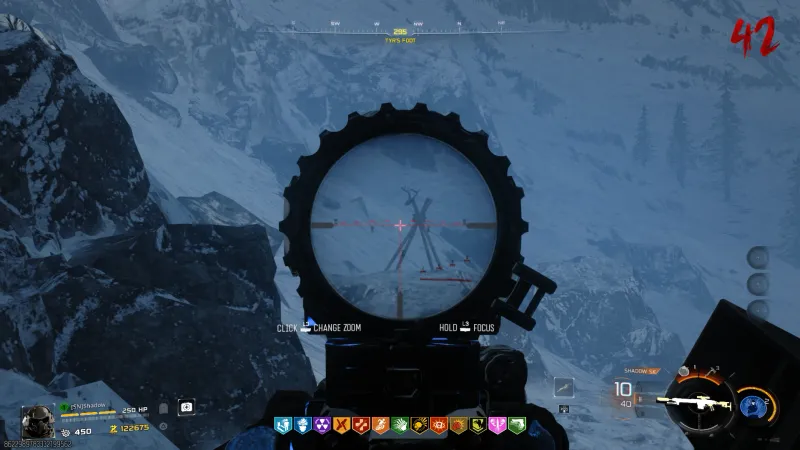
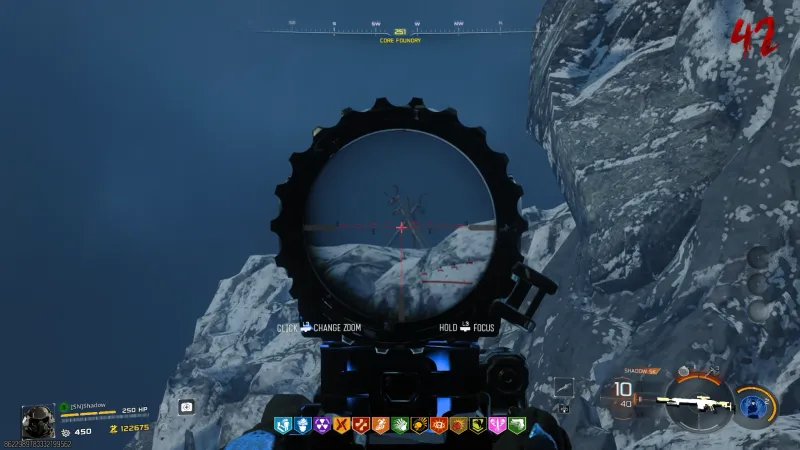
The four sniper scope locations are Borealis Landing, Burial Grounds, The Fort, and Long Meadow. From each spot, scope in and count the deer skulls on the totem. Write down or remember the number for each location. The totem with 1 skull means “first,” 2 skulls means “second,” and so on.
The number of deer skulls on each totem randomizes every game. You cannot memorize a fixed order from a previous run. Check them every time.
Step 2: Tomahawk the Bear Skin Rugs
Now that you know the order (1 through 4), head to the bear skin rugs. These are mounted on walls around the Blenheim Hall area. Each bear rug corresponds to one of the totems you just scoped.
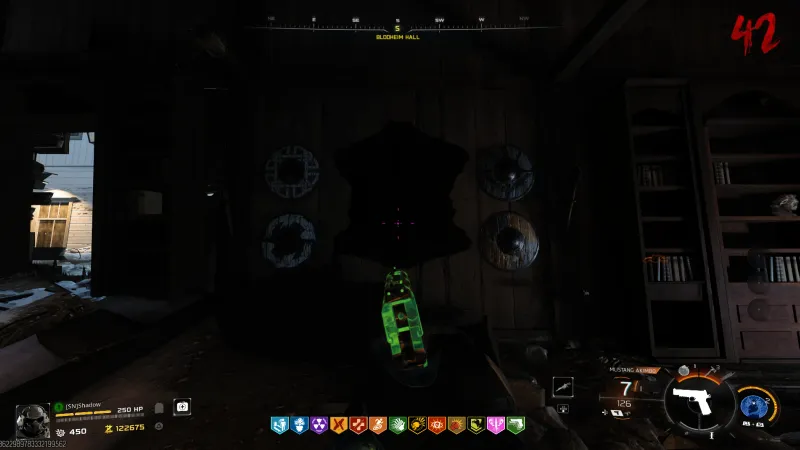
Throw your tomahawk at the bear rug that matches the totem with 1 deer skull first. Then hit the one matching 2 skulls, then 3, then 4. The colored dots on the minimap below help you match each rug to its totem.
If you hit them in the wrong order, the sequence resets and you have to start the tomahawk step over. Take your time and double check each totem through your scope before throwing.
Step 3: Enter the Portal
If you hit all four bear rugs in the correct order, a green portal spawns on one of the bear skins in Blenheim Hall.
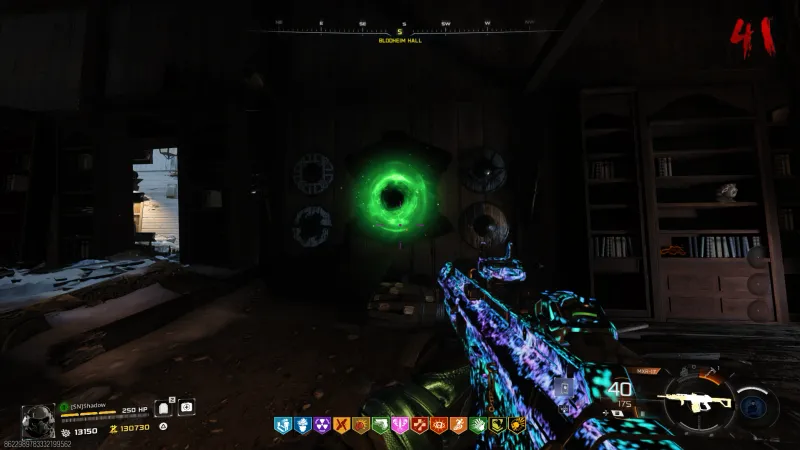
Interact with the portal to enter the relic trial. This starts the final step.
Step 4: Complete the Fire Trap Trial
Inside the trial, you need to kill three waves of zombies using fire traps. Only trap kills count. Regular weapon kills do not progress the trial.
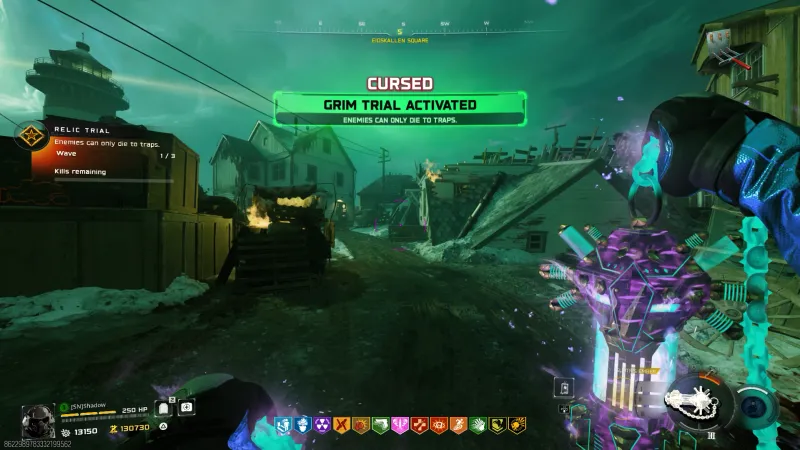
Once the trial starts, the game locks kills to traps only. You will see a wave counter on screen tracking your progress through all three waves. Any fire trap on the map works. The best strategy is to cycle between two nearby traps since each has a short cooldown after activation.
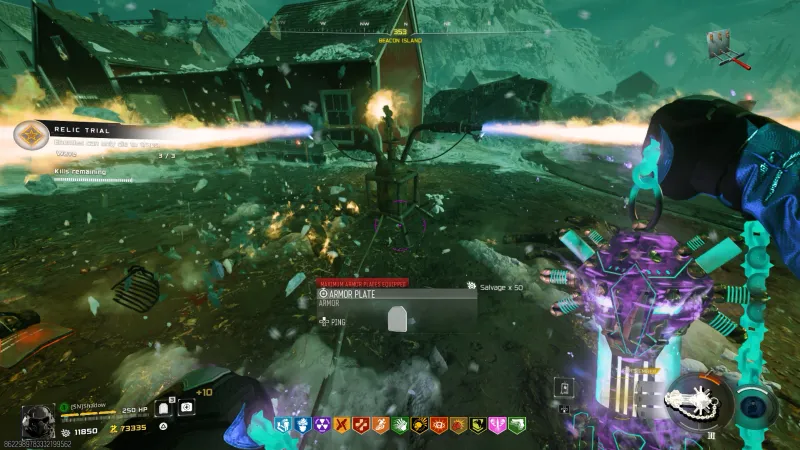
Lure zombies into the trap area, activate it, and let the fire do the work. All three waves happen back-to-back. Once wave 3 is cleared, the trial completes and you earn the Power Switch relic.

Rewards
Completing the Power Switch trial gives you:
| Reward | Type | Details |
|---|---|---|
| Power Switch | Grim Relic | Tactical and lethal equipment randomizes each round. |
| Profit Sharing | Cobalt Eclipse | Bonus cosmetic reward earned alongside the relic. |
| 1,000 XP | Experience | Added to your season progression. |
The Power Switch is one of six Totenreich relics. Here is the full list for reference:
| Tier | Relic | Effect |
|---|---|---|
| Grim | Power Switch | Equipment randomizes each round |
| Grim | Wrestler’s Belt | Wall Buys randomize each round |
| Sinister | Stuffed Elephant | Health regen delay increased (3s to 7s) |
| Sinister | Dancing Arnie | Random perk effects |
| Wicked | Agarthan Device | Different zombie type spawns each round |
| Wicked | Music Box | Enemies only take critical hit damage |
Tips for Completing the Power Switch Relic
- Build your sniper class before the match starts. The Shadow wall buy works great, but only if your build already has a high zoom scope attached. Without a scope, you cannot read the totems.
- Cycle between two fire traps to avoid waiting on cooldowns. The lighthouse trap and the Blenheim Hall area trap are close enough to rotate between.
- Write down the totem numbers as you scope them. Going back and forth to re-check wastes time and puts you at risk during higher rounds.
- The totem order changes every game. Do not rely on guides that give you a fixed 1-2-3-4 sequence for the bear rugs. You must scope the totems fresh each run.
- If your tomahawk misses a bear rug, the throw is wasted but the sequence does not reset. Only hitting the wrong rug in the wrong order causes a reset.
- This relic is fully soloable. No co-op mechanics required.
- If you need a solid loadout for reaching round 20+ comfortably, check our best BO7 Zombies loadout guide for weapon builds and perk recommendations.
Frequently Asked Questions
What does the Power Switch relic do in BO7 Totenreich?
The Power Switch relic randomizes your tactical and lethal equipment every round. At the start of each new round, your equipment changes to a random type. It affects both your tactical and lethal slots.
What do you need to unlock the Power Switch relic in Totenreich?
You need Cursed Mode Tier 1 active and to be on round 20 or later. You also need a sniper rifle with a high zoom scope to spot deer skull totems, and tomahawks as your lethal equipment. The Shadow sniper is available as a wall buy on the map.
How do you start the Power Switch trial in Totenreich?
First, use a sniper scope to locate four deer skull totems spread across the map. Count the number of deer skulls on each totem (1 through 4) and tomahawk the four bear skin rugs in Blenheim Hall in that order. A green portal spawns on one of the bear skins. Enter the portal and kill three waves of zombies using fire traps to complete the trial.
Can you do the Power Switch relic solo in Totenreich?
Yes. The entire Power Switch relic trial is soloable. There are no mechanics that require multiple players. Just make sure you have a sniper with a scope and tomahawks equipped before starting.
What are the deer skull totems for in Totenreich?
The four deer skull totems tell you the correct order for throwing tomahawks at the bear skin rugs. Each totem displays 1, 2, 3, or 4 deer skulls. The totem with 1 skull means that bear rug gets hit first, 2 skulls means second, and so on. The number of skulls on each totem randomizes every game.
What happens if you tomahawk the bear rugs in the wrong order?
The sequence resets and you need to start the tomahawk step over. Double check each totem through your sniper scope before throwing to avoid wasting attempts.
If you need help with the Power Switch relic or any other Totenreich trial, join 50,000+ players in the COD Central Discord. We have dedicated Zombies channels where the community helps each other complete relic trials daily.
